
An operation is the central building block in a Trailblazer architecture. It’s an abstraction that helps structuring your business code while taking over the control flow for you.
Operations are often confused as god objects that “do everything”. However, operations are nothing but orchestrators. Where to implement the actual code and when to call it is up to the developer.
You’re confused about Operation and Activity? It’s simple: an operation is a very thin high-level API around an activity, providing you a less clumsy Operation.call() along with the result object.
Both come with the exact same DSL.
Most of the times, operations are defined via our “step DSL”.
module Memo::Operation
  class Create < Trailblazer::Operation
    step :validate
    step :save
    left :handle_errors
    step :notify
    # ...
  end
end
It’s a convenient way for you to define what happens. The operation takes care of the when - which reduces your application code while providing a great amount of beautiful features, such as tracing.
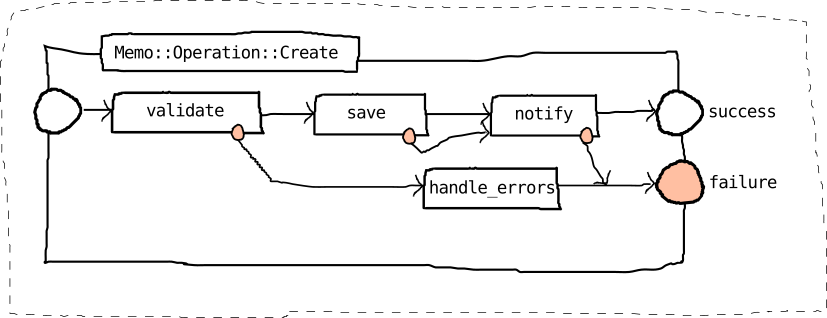
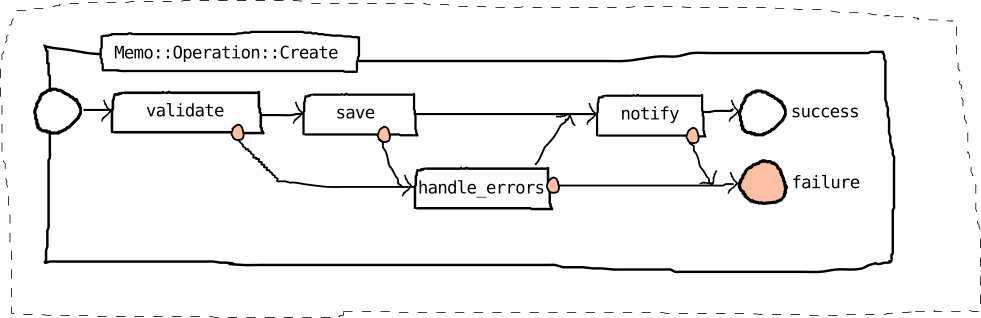
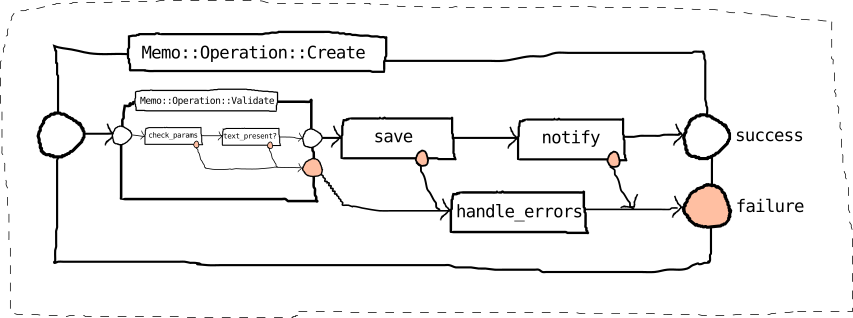
Internally, the above operation compiles to some kind of “circuit” which looks as follows.
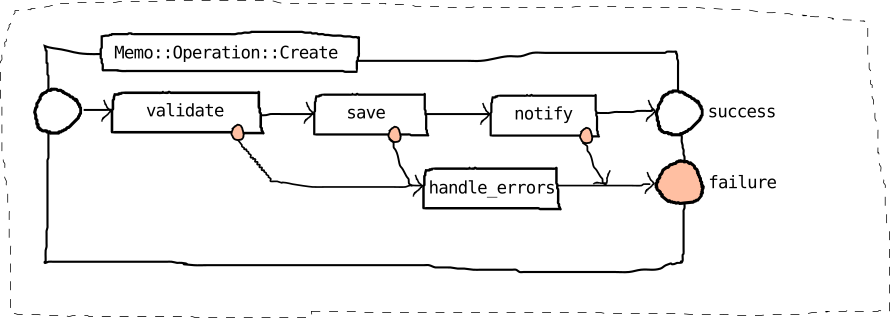
As visible, your “steps” are placed onto two tracks, forming a “railway”.
This is a great concept stolen from functional programming! The railway is your mental model of the code flow. If a step fails, the execution will deviate to the “failure track”, skipping the remaining “success” steps, and eventually stopping on the “failure terminus”. The terminus is how you communicate the outcome of your operation run to the outer world.
Now, that’s why when running your operation, the outcome will always be either “success” or “failure”.
result = Memo::Operation::Create.(
  params: {memo: {text: "Do not forget!"}}
)

result.success? # => true
puts result.terminus.to_h[:semantic] #=> :success
This is how you invoke an operation. Note how the input data goes into the operation’s #call method. It returns the terminus and the ctx object that was passed from step to step within the operation.
In an operation your application code is structured into steps. These steps can be any callable Ruby object, but very often, developers use instance methods.
Check out their signature and the return value!
module Memo::Operation
  class Create < Trailblazer::Operation
    step :validate
    # ...
    def validate(ctx, params:, **) # home-made validation
      params.key?(:memo) &&
      params[:memo].key?(:text) &&
      params[:memo][:text].size > 9
      # return value matters!
    end
  end
end
The hash given into the operation invocation is passed from step to step as ctx. Contained variables, such as :params can be accessed using Ruby’s lovely keyword arguments feature.
Steps can instruct the operation about the step outcome by returning a truthy or falsey value from the step method.
Since we’re dealing with business logic in steps, you’re allowed to write state to the ctx object. The subsequential steps can access the new variables just as any other variable on ctx.
def save(ctx, params:, **)
  memo = Memo.new(params[:memo])
  memo.save

  ctx[:model] = memo # you can write to the {ctx}.
end
After running the operation, ctx variables can also be retrieved, for example for rendering in a controller view, or in your unit tests.
result = Memo::Operation::Create.(
  params: {memo: {text: "Do not forget!"}}
)

puts result[:model] #=> #<Memo id: 1 text: "Do not forget!">
And that’s it, you just learnt the basic mechanics of operations.
Activities not only help structuring, they are an entirely new development experience that provide a rich and stable API that allows to model almost any business use case.
Operations can trace themselves when being run. This allows you to see which step had been invoked when, whether or not there was a failure, and so on.
result = Memo::Operation::Create.wtf?(
  # ...
  params: {memo: "remember me!"}
)
Just run the operation using the wtf? method instead of #call.
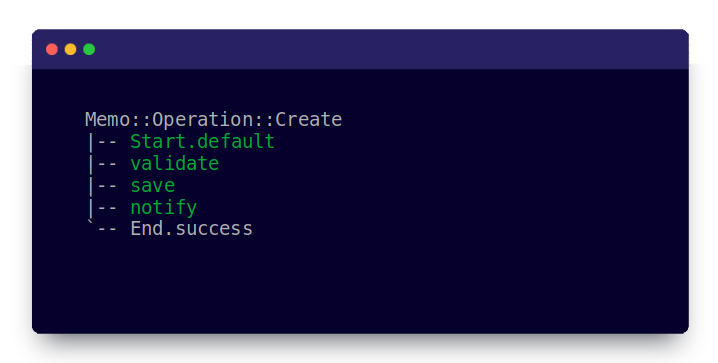
This will print the trace in the terminal, which is incredibly helpful and time-saving when working with complex operations.
Check out our video on debugging or the → DEVELOPER docs
In your operation, you can define any circuit you need in order to accomplish your task using the Wiring API. You’re not limited to a linear railway!

You may add additional termini to your operations to indicate state, go back and retry a particular step, error-out early, or even nest operations to solve more complex business logic.
For even cleaner code and maximized reusability, you can control what variables come in and out of steps. → VARIABLE MAPPING docs
module Memo::Operation
  class Create < Trailblazer::Operation
    step :create_model
    step Policy::Create,
      In() => {:current_user => :user},
      In() => [:model],
      Out() => [:message]
    # ...
  end
end
Using our PRO debugger, you can even trace this variable flow.
We are (finally, and definitely!) releasing PRO in 2024 which will bring us the workflow gem and our BPMN editor to model and implement complex, long-running workflows.
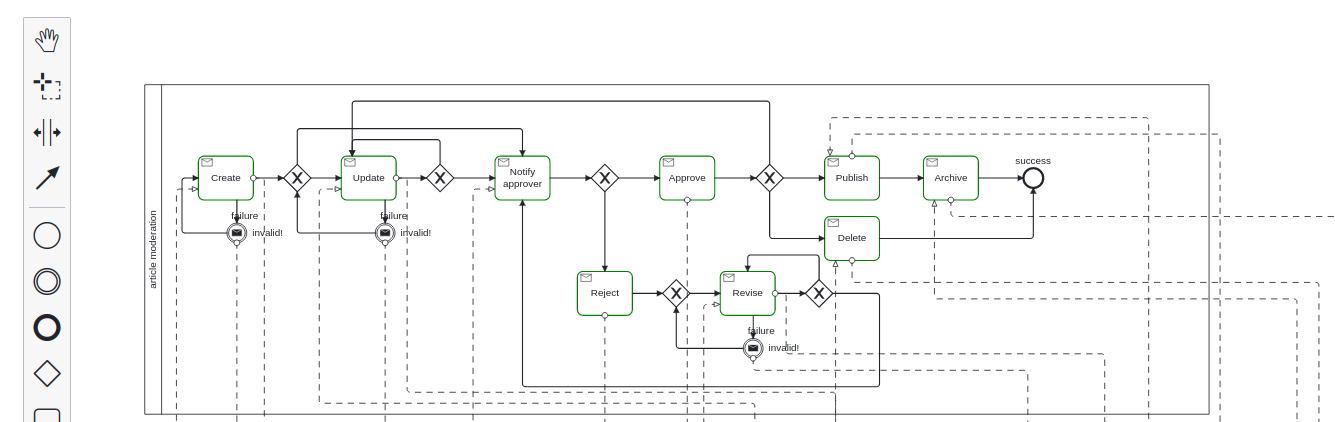
This will be pretty exciting and introduces “enterprise” concepts that haven’t been around in Ruby so far.
This chapter discusses the fundamental building blocks and concepts of operations: steps, signals, the ctx object and how to run operations.
Operations represent functions in your application, both in a domain-oriented way and from a programmatical point of view. That is why there’s only one way to run an operation.
The #call class method is how you run your operation along with its steps.
result = Memo::Operation::Create.call(params: {memo: nil})
And that’s literally the only way to invoke your steps. It is not allowed to run a subset of steps, only. If you need that, you might have to introduce a new operation, or change the wiring to achieve the same effect.
In Ruby, it’s possible to skip the word call. That’s why you might often see invocations of operations that might look a bit cryptic in the beginning.
result = Memo::Operation::Create.(params: {memo: nil})
Anyhow, the implicit call style underlines the functional aspect of an operation. Since, per convention, the operation name is a verb (e.g. Create) there’s no need to think of another verb to actually run that “verb”. That’s why we love the implicit call style!
Any variables you pass into the invocation will be readable by all steps of the operation (unless configured otherwise).
result = Memo::Operation::Create.(params: {memo: nil})
Here, the :params variable can be accessed in each step via the ctx object, which is the first positional argument passed to each step.
module Memo::Operation
  class Create < Trailblazer::Operation
    step :validate
    # ...
    def validate(ctx, **)
      p ctx[:params] #=> {:memo=>nil}
    end
  end
end
While this is a breathtaking feature of Trailblazer, it’s a bit clumsy and we got a more convenient way to read from ctx.
Instead of manually checking ctx for the presence of a particular variable, you can add a keyword argument to your step’s signature.
def validate(ctx, params:, **)
  p params #=> {:memo=>nil}
end
The :params variable is now a local variable params in your step method.
Another benefit: if the caller of your operation fails to provide :params, Ruby will complain automatically of a missing keyword!
result = Memo::Operation::Create.(current_user: user)
#=> ArgumentError: missing keyword: :params
#       memo/operation/create.rb:9:in `validate'
Ruby’s epic keyword arguments even allow defaulting of variables, should they be absent in ctx.
Note that you can use any number of keyword arguments in your signature.
It is also possible to write to ctx, should you fancy to publish information out of the step.
def save(ctx, params:, **)
  ctx[:model] = Memo.new(params[:memo])
end
The following steps will be able to read the :model variable exactly the same way it worked with :params.
module Memo::Operation
  class Create < Trailblazer::Operation
    step :validate
    step :save # sets ctx[:model]
    step :notify
    # ...
    def notify(ctx, model:, **)
      send_email(model)
    end
  end
end
Once an operation run finished, variables added to the ctx are readable by the caller on the outside via the result object.
Keep in mind that the above is the default behavior. You may configure what comes in and goes out of a step using variable mapping.
When being invoked with #call, the operation works off its steps in the order they were defined with #step. This is called the “happy path”, or the success track.
Once a step returns a “failure”, the operation will deviate to the “failure track” and skip the remaining steps on the success track. Instead, the remaining steps added using #left (formerly #fail) will be executed.
Steps can communicate their outcome to the operation’s flow control with their return value.
The #validate step in our example does a simple check to see if params[:memo] is present.
def validate(ctx, params:, **)
  params.key?(:memo) # => true/false
end
Since this is the only line in the method, the return value will be either true, signalizing a successful validation, or false, indicating there’s a formal problem with the incoming user data.
The return value doesn’t have to true or false, but can be any “truthy” or “falsey” (e.g. nil) value.
A falsey return value will deviate the operation’s path to the failure track.
def validate(ctx, params:, **)
  nil
end
This depressive step will always return a falsey value (nil is evaluated to false), the remaining success path steps will always be skipped. Don’t do this!
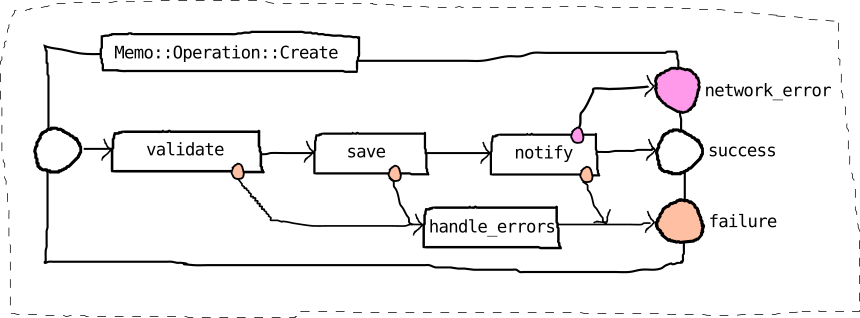
The binary true/false outcome is useful for many scenarios. However, sometimes a step might have a third outcome - for example, to indicate a network error that needs to be handled off the failure track.
def notify(ctx, model:, params:, **)
  return NetworkError unless check_network(params)

  send_email(model)
end
In this step, we’re returning a “third” possible value. The trick is: the NetworkError needs to be a subclass of Signal.
module Memo::Operation
  class Create < Trailblazer::Operation
    class NetworkError < Trailblazer::Activity::Signal
    end
    # ...
  end
end
That way, the operation’s routing will recognize this third outcome. Speaking of, the third scenario needs to be properly connected using the Wiring API.
step :validate
step :save
left :handle_errors
step :notify,
  Output(NetworkError, :network_error) => End(:network_error)
Using tools the Wiring API provides, this adds new connections plus an entire new terminus of our operation!
Here, #notify encountering a disastrous network error will make the operation stop the execution in a third terminus called network_error.
In general, a terminus is a way to communicate an outcome state of a particular operation to the user. This can be as simple as manually running an operation and checking which terminus it stopped in.
result = Memo::Operation::Create.(params: {memo: nil, network_broken: true})

result.terminus.to_h[:semantic] #=> :network_error
You can ask the terminus for its semantic by calling #to_h. The semantic can be any meaningful term you want, for instance, we named the success path terminus :success.
Those termini start making even more sense when nesting operations.
module Endpoint
  class API < Trailblazer::Operation
    step Subprocess(Memo::Operation::Create),
      Output(:network_error) => Track(:failure)
    # ...
  end
end
It is possible (and required!) to wire termini of a nested operation into the container circuit - this is much cleaner than handling different outcomes by hand, and allows for tracing and debugging.
Check out the Wiring API to learn how to leverage multiple outcomes in operations.
As the ctx is being passed from step to step, it accumulates data. In order to access this data on the outside, the ctx is converted to a result object after the run is finished.
You can read variables using the #[] reader.
result = Memo::Operation::Create.(params: {memo: {content: "remember that"}})

result[:model] #=> #<Memo id: 1, ...>
In addition to the ctx variables, the result object also exposes the outcome of the entire operation run.
puts result.success? #=> true
For your convenience, the result object also exposes #failure? as a counter-part.
Operations are classes that provide a DSL to model the logic circuit.
module Memo::Operation
  class Create < Trailblazer::Operation
    step :create_model
    step :validate
    step :save
    # ...
  end
end
You can use Ruby’s inheritance to derive subclasses from operations.
Inheritance allows you to share logic and behavior across any number of subclasses.
module Memo::Operation
  class Update < Create
  end
end
Subclassing will not only copy over methods, but the entire circuit of Create along with its three steps.
You can now insert, replace or even delete new steps in the Update class.
module Memo::Operation
  class Update < Create
    step :find_model, replace: :create_model
    # ...
  end
end
This will replace the create_model step with new find_model logic. Obviously, you have to provide the #find_model method in the Update class.
When inserting steps into subclasses you can use any step DSL options. You might even drill into deeply nested, inherited class compounds using #patch.
When writing operations, most of the time you will use #step and #left to configure your activity’s circuit. While it is possible to model any kind of flow, the operation’s “Step DSL” is optimized for building a railway layout.
In operations, the Railway layout is used to build circuits with “automatic” error handling. You arrange your actual chain of logic on the “success” track, if a problem occurs, the processing jumps to the parallel “failure” track, skipping the rest of the tasks on the success track.
Once on the failure track, it stays there (unless you instruct not to do so!).
module Memo::Operation
  class Create < Trailblazer::Operation
    step :validate
    step :save
    left :handle_errors
    step :notify
    # ...
  end
end
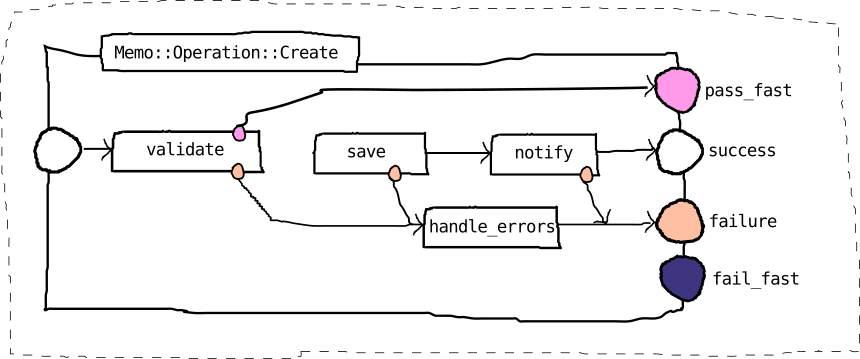
This operation will look as follows.
Four possible execution paths this operation might take.
validate, then save, then notify, then terminate in End.success. The operation was successful.validate, which returns a Left (failure) signal, leading to handle_errors, then terminate in End.failure.validate, then save, which deviates to the failure track, leading to End.failure.validate, save, then notify fails, terminating in End.failure. Note that this doesn’t hit the error handler due to the sequence order.For placing a step onto the success track, use #step.
module Memo::Operation
  class Create < Trailblazer::Operation
    step :validate
    step :save
    # ...
This simply puts one step after another, in the order you define, on the success track.
Note that it’s possible to insert steps by using inheritance or modules. # FIXME
Without any options, the step’s interface is expected to follow the “step interface”. # FIXME
To place tasks on the failure track, use #left. Again, the order and position defines where this particular step will sit on the failure track.
module Memo::Operation
  class Create < Trailblazer::Operation
    step :validate
    step :save
    left :handle_errors
    # ...
Obviously, you may use as many tasks as you need on this track - there are no limitations.
Historically, the success path is called “right” whereas the error handling track is “left”. The signals Right and Left in Trailblazer are still named following this convention.
Before we introduced #left, the DSL method to place steps onto the failure track was named #fail.
module Memo::Operation
  class Create < Trailblazer::Operation
    step :validate
    step :save
    fail :handle_errors # just like {#left}
    # ...
  end
end
Both methods are identical. It is not deprecated, feel free to use it instead of #left, should your editor allow it.
If the return value of a task on the success path shouldn’t matter, use #pass.
module Memo::Operation
  class Create < Trailblazer::Operation
    step :validate
    pass :save # no output goes to the failure track here.
    left :handle_errors
    # ...
  end
end
#save’s return value is ignored in the operation run, the next step will always be #notify on the success track.

An operation can be composed of any number of steps. Steps can be callable Ruby objects or instance methods of the operation itself.
When adding a step using #step or #left, the step’s interface is considered to be exposing the “step interface”. Note that you can also implement steps with a low-level interface called the “circuit interface” that is clumsier but also richer.
A step declared with a :symbol, as done here with #validate, will be considered an instance method of the operation class. This style allows to define the operation layout before implementing the steps in the same class.
module Memo::Operation
  class Create < Trailblazer::Operation
    step :validate

    def validate(ctx, params:, **)
      params.key?(:memo) ? true : false # return value matters!
    end
  end
end
Signature and return value are identical to all other step types.
A class method can come in handy if you want to reuse this particular step in an entirely different operation.
module Memo::Operation
  class Create < Trailblazer::Operation
    # Define {Memo::Operation::Create.validate}
    def self.validate(ctx, params:, **)
      params.key?(:memo) ? true : false # return value matters!
    end

    step method(:validate)
  end
end
Note that the actual class method has to be defined before retrieving the method object via method(:validate). Again, signature and return value are identical to other styles.
Just like a class method, steps can come from any module - this makes it straight-forward to create reusable chunks of logic.
# Reusable steps in a module.
module Steps
  def self.validate(ctx, params:, **)
    params.key?(:memo) ? true : false # return value matters!
  end
end
The mechanics to use a “foreign” method as a step are identical to using a class method - they simply rely on Ruby’s #method function.
module Memo::Operation
  class Create < Trailblazer::Operation
    step Steps.method(:validate)
  end
end
This is a common technique in complex Trailblazer applications for creating reusable steps with a high degree of maintainability.
As a matter of fact, any object, module or class exposing a #call method can be a step!
module Validate
  def self.call(ctx, params:, **)
    valid?(params) ? true : false # return value matters!
  end

  def valid?(params)
    params.key?(:memo)
  end
end
Callable objects are often used when the step’s logic exceeds a certain threshold of complexity and you want to introduce additional methods, as the above #valid? function.
Keep in mind that a step can also be implemented using a second operation. You can use the Subprocess() macro to nest operations.
Another trick, mostly used for debugging, is to use a lambda as a step.
module Memo::Operation
  class Create < Trailblazer::Operation
    step ->(ctx, params:, **) { p params.inspect }
  end
end
Obviously, this is not really sustainable and should be replaced with one of the above options.
In addition to wiring options, there are a handful of other options known as sequence options. They configure where a task goes when inserted, and helps with introspection and tracing.
The DSL will provide default names for tasks.
You can name explicitely using the :id option.
module Memo::Operation
  class Create < Trailblazer::Operation
    step :validate
    step :save, id: :save_the_world
    step :notify
    # ...
  end
end
The IDs are as follows.
Trailblazer::Developer.railway(Memo::Operation::Create)
#=> [>validate,>save_the_world,>notify]
Assigning explicit IDs to steps is advisable when you’re planning use patching or inheritance. Keep in mind that this ID will be part of your internal (but public) API.
Naming also shows up in tracing and introspection.
If no :id is provided, defaults names are given to steps - these might be awkward sometimes.
When it’s necessary to remove a task, you can use :delete.
module Memo::Operation
  class Admin < Create
    step nil, delete: :validate
  end
end
The :delete option can be helpful when using modules or inheritance to build concrete operations from base operations. In this example, a very poor one, the validate task gets removed, assuming the Admin won’t need a validation.
Trailblazer::Developer.railway(Memo::Operation::Admin)
#=> [>save_the_world,>notify]
All steps are inherited, then the deletion is applied, as the introspection shows.
To insert a new task before an existing one, for example in a subclass, use :before.
module Memo::Operation
  class Authorized < Memo::Operation::Create
    step :policy, before: :validate
    # ...
  end
end
The activity now contains a new policy step just before the inherited tasks.
Trailblazer::Developer.railway(Memo::Operation::Authorized)
#=> [>policy,>validate,>save_the_world,>notify]
To insert after an existing task, you might have guessed it, use the :after option with the exact same semantics as :before.
module Memo::Operation
  class Authorized < Memo::Operation::Create
    step :policy, after: :validate
    # ...
  end
end
The task is inserted after, as the introspection shows.
Trailblazer::Developer.railway(Memo::Operation::Authorized)
#=> [>validate,>policy,>save_the_world,>notify]
Replacing an existing task is done using :replace.
module Memo::Operation
  class Update < Create
    step :update, replace: :save
    # ...
  end

end
Replacing, obviously, only replaces in the applied class, not in the superclass.
Trailblazer::Developer.railway(Memo::Operation::Update)
#=> [>validate,>update,>notify]
Working with Subprocess and nested activities is a great way to encapsulate and create reusable code especially with complex logic. However, it can be a PITA if you want to customize one of those deeply nested components and add, replace or remove a certain step.
Suppose the following 3-level nested activity.
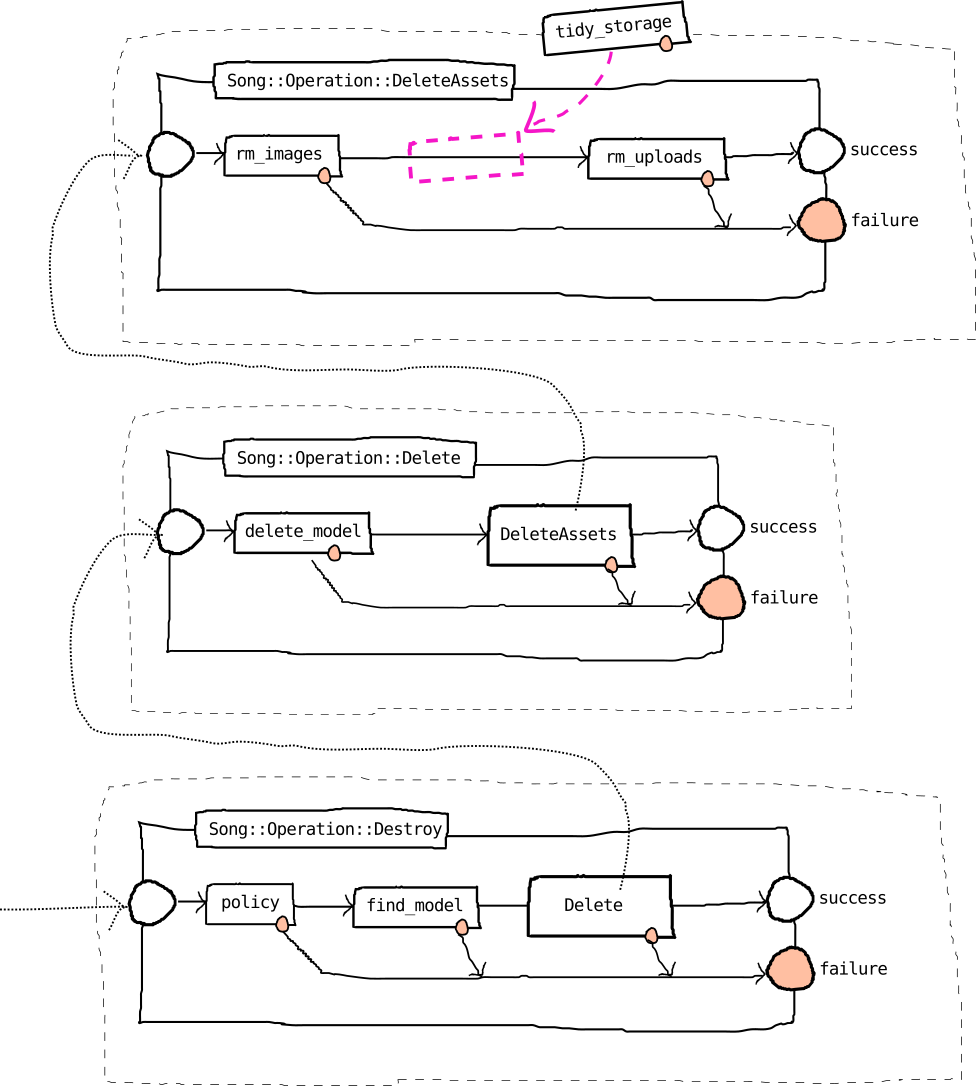
The public operation Destroy contains Delete as a nested activity, which itself contains DeleteAssets. In order to customize the latter one and add another step tidy_storage, you’d normally have to subclass all three activities and override steps.
Using #patch, you can modify nested activities from the uppermost activity and let Trailblazer do the legwork.
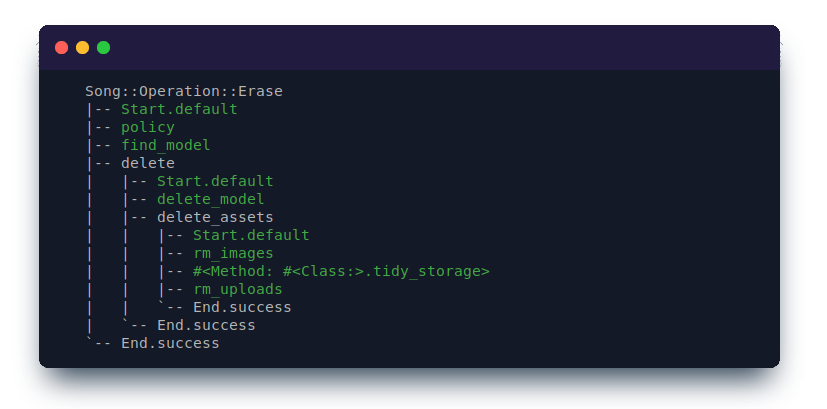
As #patch is mostly used when leveraging inheritance we introduce a subclass of Destroy which is called Erase and introduces the #tidy_storage step. As illustrated above, this new step should be inserted in DeleteAssets activity that itself is nested in Delete, which again is one step of Destroy.
class Erase < Destroy # we're inheriting from Song::Operation::Destroy
  # ...
  def self.tidy_storage(ctx, **)
    # delete files from your amazing cloud
  end
  # ...
  # These steps are inherited:
  # step :policy
  # step :find_model
  # step Subprocess(Delete), id: :delete

  extend Trailblazer::Activity::DSL::Linear::Patch::DSL

  # Note the path you pass to #patch.
  patch(:delete, :delete_assets) {
    step Erase.method(:tidy_storage), after: :rm_images
  }
end
The patching logic accepts a path to the particular activity that you want to modify.
patch(:delete, :delete_assets) { ... }The provided block is executed within that targeted activity and executed as if you’d extend that class. However, the entire modification will only change Erase, all other traversed activities are copied and then modified, leaving the original implemenation unchanged.
The #patch method is perfect when using inheritance to first copy over behavior and control flow, and then fine-tune it for the specific use case.
If you’re not using inheritance and want to tweak a nested activity ad-hoc the Subprocess() helper accepts a :patch option.
class Destroy < Trailblazer::Activity::Railway
  def self.tidy_storage(ctx, **)
    # delete files from your amazing cloud
    true
  end
  # ...
  step :policy
  step :find_model
  step Subprocess(Delete,
    patch: {
      [:delete_assets] => -> { step Destroy.method(:tidy_storage), before: :rm_uploads }
    }
  )
end
This works just like the #patch function but returns the patched activity.
Subprocess() accepts the :patch option which consists of a hash of the path to the customized activity, and its patch.
This will result in an identical operation as in the above example with #patch. However, Delete is now the operation containing the customization, not a new class Erase.
Patching can be also done at the top-level activity by passing :patch as a block (Take Delete from above example).
step Subprocess(
  Delete,
  patch: -> { step Destroy.method(:tidy_storage), before: :delete_model }
), id: :delete
You can use the wiring API to model more complicated circuits in operations.
Since the wiring API is part of the Step DSL, it’s implemented in the trailblazer-activity-dsl-linear gem. Feel invited to extend our DSL!
Without additional configuration, when using #step the following happens.
#step or #left for insertion (internally, this happens via the :magnetic_to option).success output is connected to the following step on the success track. Usually, this would be the success terminus.failure output.
Looking closer at a step, the orange circle on a step’s edge represents the failure output. The outgoing line without any circle is the success output.
Technically, this diagram is incorrect since steps sitting on the failure track have two outputs as well. However, as both outputs are linked to the next failure step, this is usually depicted as a single line.
Now, let’s see how we can customize this operation using the Wiring API.
When modeling more complex circuits and becoming familiar with the Wiring API, do not get frustrated! Use our trailblazer-developer gem to quickly visualize what you’ve just built.
puts Trailblazer::Developer.render(Memo::Operation::Create)

#<Start/:default>
 {Trailblazer::Operation::Right} => #<Trailblazer::Operation::TaskBuilder::Task user_proc=validate>
#<Trailblazer::Operation::TaskBuilder::Task user_proc=validate>
 {Trailblazer::Operation::Left} => #<Trailblazer::Operation::TaskBuilder::Task user_proc=handle_errors>
 {Trailblazer::Operation::Right} => #<Trailblazer::Operation::TaskBuilder::Task user_proc=save>
#<Trailblazer::Operation::TaskBuilder::Task user_proc=save>
 {Trailblazer::Operation::Left} => #<Trailblazer::Operation::TaskBuilder::Task user_proc=handle_errors>
 {Trailblazer::Operation::Right} => #<Trailblazer::Operation::TaskBuilder::Task user_proc=notify>
#<Trailblazer::Operation::TaskBuilder::Task user_proc=handle_errors>
 {Trailblazer::Operation::Left} => #<End/:failure>
 {Trailblazer::Operation::Right} => #<End/:failure>
#<Trailblazer::Operation::TaskBuilder::Task user_proc=notify>
 {Trailblazer::Operation::Left} => #<End/:failure>
 {Trailblazer::Operation::Right} => #<End/:success>
#<End/:success>

#<End/:failure>
The render method returns the actual circuit in a more or less human-readable form.
Rewiring a particular step always starts with Output(). This DSL helper allows you to specify which outgoing connection you’re planning to reconnect.
In a railway-based activity, such as Trailblazer::Operation, each step exposes two outputs per default: :success and :failure. This is why you can simply reference that well-known output by its semantic. The one-argument form of Output() we call “implicit output”.
module Memo::Operation
  class Create < Trailblazer::Operation
    step :validate
    step :save,
      Output(:failure) => Track(:success)
    left :handle_errors
    step :notify
    # ...
  end
end
With this customization, you’re building a bullet-proof #save step, that even in case of failure goes back to the success track. Hopefully, your #save logic is failsafe.
This, by the way, is how #pass is implemented.
If needed, a step can have more than two outcomes. For instance, #save could detect and report a database error in addition to its binary outcomes of success and failure.
module Memo::Operation
  class Create < Trailblazer::Operation
    class DbError < Trailblazer::Activity::Signal; end

    step :validate
    step :save,
      Output(DbError, :database_error) => Track(:failure)
    left :handle_errors
    step :notify
    # ...
  end
end
To add an output, you call Output() with two arguments: the signal to indicate, and the semantic of that new output. Note that the signal has to be derived from Trailblazer::Activity::Signal.
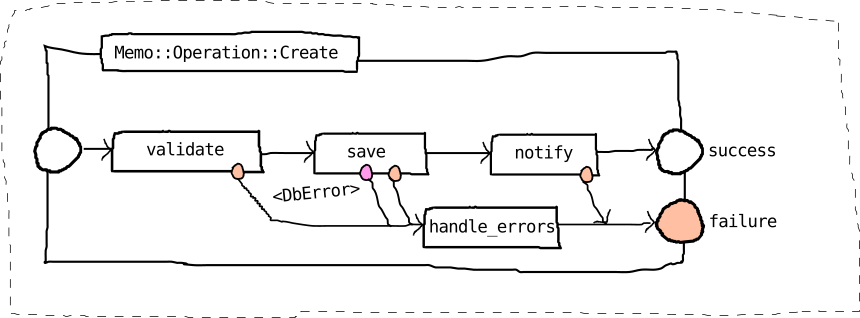
In this example, the new output :database_error is routed straight to the failure track. When the operation teminates, you might not be able to see why it failed: it might be better to introduce a separate terminus.
It might be worth noting that all steps in a railway have two standard outputs, even those put on the failure track using #left! That’s why you don’t have to stay on the failure track, you could divert anywhere you want.
module Memo::Operation
  class Create < Trailblazer::Operation
    step :validate
    step :save
    left :handle_errors,
      Output(:success) => Track(:success)
    step :notify
    include T.def_steps(:validate, :save, :handle_errors, :notify)
  end
end
If the #handle_errors step returns a truthy value, the operation goes back to the success track.
This pattern can be used for error handling, deciders, or alternate routes.
A terminus represents an outcome of an operation run. It’s not only helpful when running an operation manually, but also when nesting operations.
You can use the End() helper to connect an output directly to either an existing terminus (most of the times, that’d be :success or :failure), or you can wire it to a new terminus.
module Memo::Operation
  class Create < Trailblazer::Operation
    step :validate
    step :save,
      Output(:failure) => End(:db_error)
    left :handle_errors
    step :notify
    # ...
  end
end
Two things happen here: first, the new terminus :db_error is added to the operation as it represents an unknown, new terminus. Then, the failure output of #save gets connected to it.
You may use End() multiple times in one operation. This will connect the steps to the same terminus.
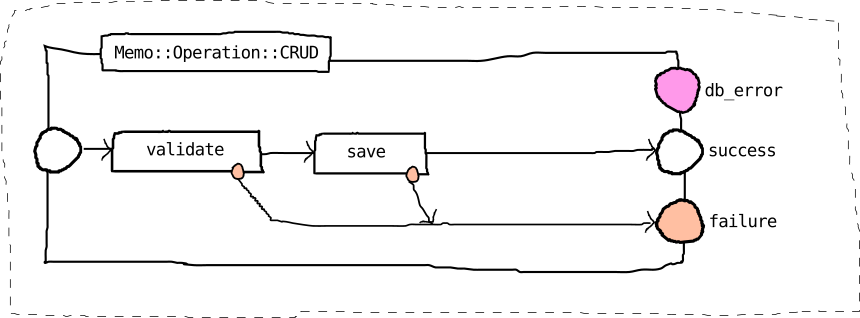
Instead of End() you may add additional termini to an operation using #terminus.
module Memo::Operation
  class CRUD < Trailblazer::Operation
    step :validate
    step :save
    terminus :db_error
    # ...
  end
end
The CRUD class here acts as an abstract template for concrete operations.
In a subclass, you could then connect steps to this new terminus using End().
module Memo::Operation
  class Create < CRUD
    step :notify,
      Output(:failure) => End(:db_error)
    # ...
  end
end
Note that there are more inheritance mechanics for building template operations, such as the :inherit option.
Use Track() when you want a step’s output to connect to the next
step that is “magnetic to” the desired track.
For instance, a step (or terminus) sitting on the success track will be attracting the predecessor step to connect to it.
module Memo::Operation
  class Create < Trailblazer::Operation
    step :validate
    step :save,
      Output(:failure) => Track(:success)
    left :handle_errors
    step :notify
    # ...
  end
end
Track() expects the track name, or the “polarization”, as we call it sometimes.
Here, the wiring algorith will connect the :failure output of the #save step to the next available step on the :success track, which is #notify.
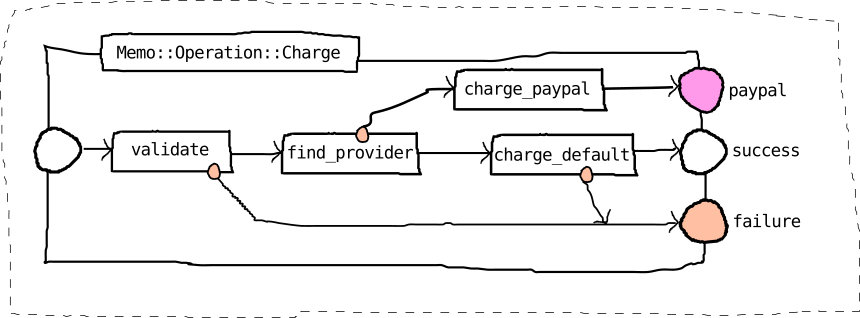
You can build entire new tracks using a combination of Track() and :magnetic_to.
module Memo::Operation
  class Charge < Trailblazer::Operation
    terminus :paypal # add a custom terminus (if you need it)
    step :validate
    step :find_provider,
      Output(:failure) => Track(:paypal)
    step :charge_paypal,
      magnetic_to: :paypal, Output(:success) => Track(:paypal)
    step :charge_default
    # ...
  end
end
When adding a terminus via #terminus, its “polarization” will be the same name as its semantic, :paypal in this example (this is achieved using the :magnetic_to option behind the scenes).
Next, we add #find_provider and reference Track(:paypal) for one of its outputs. This will be connected to the next possible step “magnetic to” :paypal.
To manually place a step onto that new track, you need to use :magnetic_to and Output() as it’s done with #charge_paypal.
This will compile the following operation circuit.

To explicitly connect an output to a particular step, use Id().
module Memo::Operation
  class Create < Trailblazer::Operation
    step :validate,
      Output(:failure) => Id(:notify)
    step :save
    left :handle_errors
    step :notify
    include T.def_steps(:validate, :save, :handle_errors, :notify)
  end
end
This will, for whatever reasons, connect the failure output of #validate straight to #notify.

Keep in mind that using Id() won’t allow inserting another step between the two just connected. If you want to insert more steps on that connection at a later point, or in a subclass, use Track().
Most of the times, the step DSL will wire your steps automatically. Sometimes it might be necessary to make one or several steps “snap to” a particular track.
The :magnetic_to option allows to configure what incoming connections a step attracts.
module Memo::Operation
  class Create < Trailblazer::Operation
    step :validate
    step :payment_provider, Output(:failure) => Track(:paypal)
    step :charge_paypal, magnetic_to: :paypal
    step :save
  end
end
Using this option, the charge_paypal step will not be placed on the success track, but the paypal track.
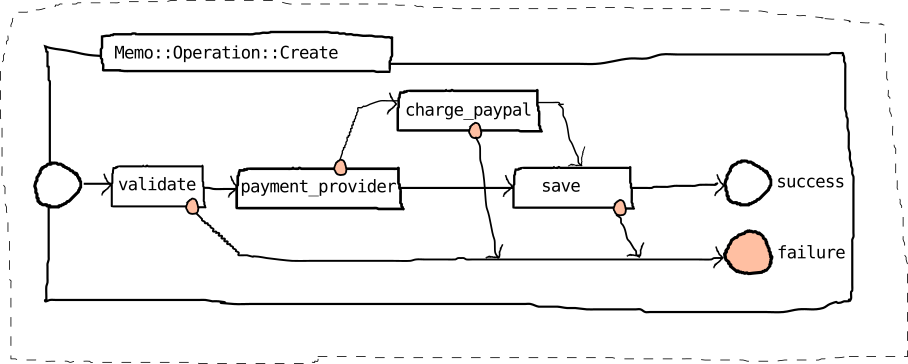
As you can see, outgoing connections are still automatically connected. You can use Output() to change that.
The :magnetic_to option is very low-level and shouldn’t be used without knowing what and why you’re doing it.
Consider using the Path() helper instead.
For branching out a separate path in an operation, use the Path() macro. It’s a convenient, simple way to declare alternative routes, even if you could do everything it does manually.
You can use the :terminus option for Path() to lead the path to an existing or new terminus.
module Memo::Operation
  class Charge < Trailblazer::Operation
    step :validate
    step :find_provider,
      Output(:failure) => Path(terminus: :paypal) do
        # step :authorize # you can have multiple steps on a path.
        step :charge_paypal
      end
    step :charge_default
    # ...
  end
end
If the #find_provider steps returns false, the steps on the “paypal” path will be executed. Since we are using the :terminus option, the run stops in the new terminus :paypal .
You don’t necessarily have to use the :failure output in order to branch out a new path. You might as well use an additional signal, or any other predefined output of the task.
When using Path(), the steps on the path will only have one :success output. Note that there’s no connection going to the failure track from #charge_paypal.
We’re working on a :failure option for Path() to allow steps with a failure output.
If you want the path to reconnect and join the railway at some point, use the :connect_to option.
module Memo::Operation
  class Charge < Trailblazer::Operation
    step :validate
    step :find_provider,
      Output(:failure) => Path(connect_to: Id(:finalize)) do
        # step :authorize # you can have multiple steps on a path.
        step :charge_paypal
      end
    step :charge_default
    step :finalize
    # ...
  end
end
Instead of creating an additional terminus, the last path step will be connected to whatever step is specified via the Id() helper.

You can easily branch out and handle specific edge cases using this helper.
While you could manually nest an operation into another, the Subprocess() macro helps to embed an operation as a step of a container operation.
Consider the following operation implementing a more complex validation. By extracting that logic to a separate operation, you’re making this code better testable, and reusable across your application.
module Memo::Operation
  class Validate < Trailblazer::Operation
    step :check_params
    step :text_present?
    # ...
  end
end
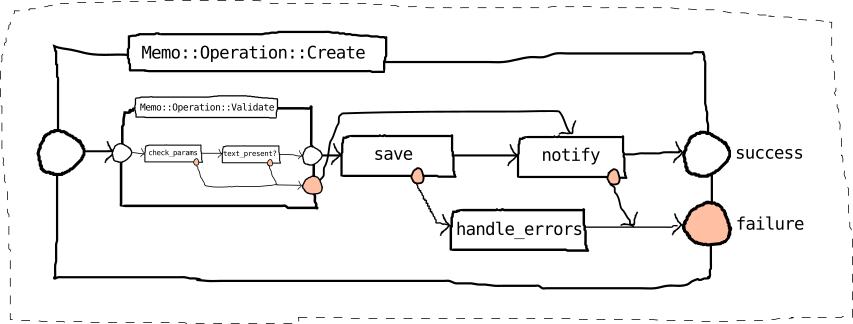
Use Subprocess() to nest it into the Create operation.
module Memo::Operation
  class Create < Trailblazer::Operation
    step Subprocess(Validate)
    step :save
    left :handle_errors
    step :notify
    # ...
  end
end
The macro automatically wires all of Validate’s termini to the known counter-part tracks.
The Subprocess macro will go through all outputs of the nested operation, fetch their semantics and search for tracks with the same semantic - it’s that simple.
Note how the nested operation really acts as if it’s a plain step - in fact, the execution code doesn’t even know this is a “real” separate operation.
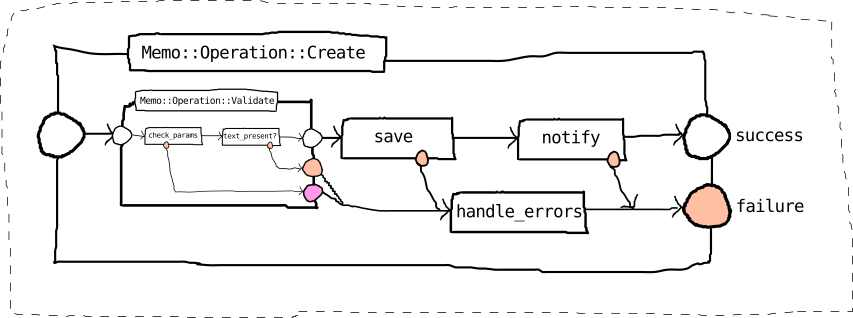
You can use the familiar Wiring DSL to reconnect termini of the nested operation.
module Memo::Operation
  class Create < Trailblazer::Operation
    step Subprocess(Validate),
      Output(:failure) => Id(:notify)
    step :save
    left :handle_errors
    step :notify
    # ...
  end
end
For demonstration purposes, the nested’s failure output now goes straight to #notify.
This is identical to connecting a “normal” step’s output and allows to treat particular outcomes of a nested operation in a non-standard way - for example, routing a “failed” terminus to a success path.
A nested operation doesn’t have to have two termini, only.
module Memo::Operation
  class Validate < Trailblazer::Operation
    step :check_params,
      Output(:failure) => End(:invalid)
    step :text_present?
    # ...
  end
end
The Validate operation could expose a third terminus :invalid to indicate that params wasn’t formatted properly.
Subprocess() will try to match the nested termini semantics to the tracks it knows. You may wire a custom terminus like :invalid using Output().
module Memo::Operation
  class Create < Trailblazer::Operation
    step Subprocess(Validate),
      Output(:invalid) => Track(:failure)
    step :save
    left :handle_errors
    step :notify
    # ...
  end
end
The new special terminus is now wired to the failure track of the containing Create operation.
You may connect the custom terminus using any of the Wiring’s API helpers.
There will be an IllegalSignalException exception thrown at runtime time when not connecting a custom terminus. Use the :strict option to avoid runtime problems.
The :strict option is still experimental: https://github.com/trailblazer/trailblazer-activity-dsl-linear/issues/59
When nesting another operation (or Activity::FastTrack), its fast-track temini won’t be connected automatically. Just like with a “normal” step, you need to instruct the Wiring API.
module Memo::Operation
  class Create < Trailblazer::Operation
    step Subprocess(Validate), fast_track: true
    step :save
    left :handle_errors
    step :notify
    # ...
  end
end
By providing fast_track: true, the nested termini will be connected to the matching outer tracks.
Omitting this option is usually the source for an IllegalSignalError at run-time.
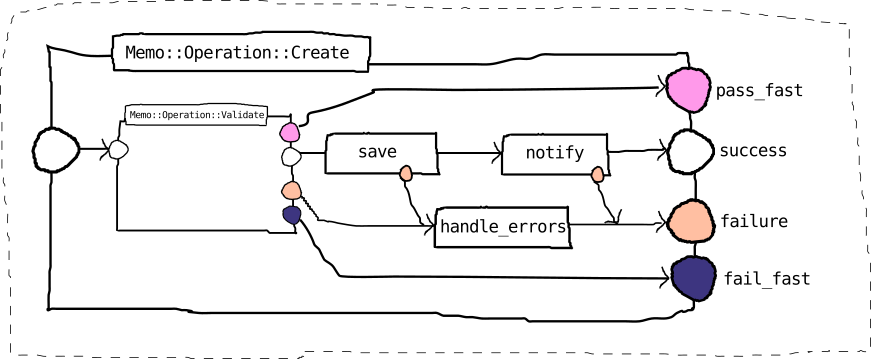
The operation is based on the FastTrack layout and provides three more options for configuring a step’s connections.
The :pass_fast option wires the :success output straight to the new pass_fast terminus.
module Memo::Activity
  class Create < Trailblazer::Activity::FastTrack
    step :validate, pass_fast: true
    step :save
    fail :handle_errors
    # ...
  end
end
If validate returns a true value, it will skip the remaining tasks on the success track and terminate in the pass_fast terminus.
Note that in the example, the #save step not accessable anymore, so maybe it’s a good idea to refrain from such a layout.
The counter-part for :pass_fast is :fail_fast and allows to instantly stop the operation.
module Memo::Activity
  class Create < Trailblazer::Activity::FastTrack
    step :validate, fail_fast: true
    step :save
    fail :handle_errors
    # ...
  end
end
A falsey return value from #validate will deviate the flow and go straight to the fail_fast terminus.
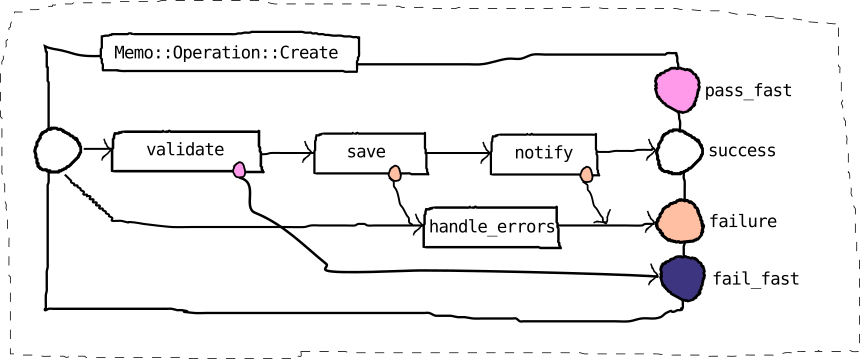
Even though #handle_errors is on the failure track, it won’t be reached from #validate.
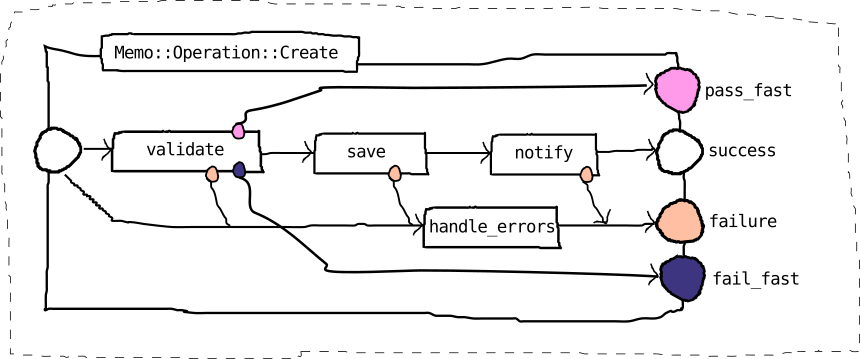
When setting the :fast_track option, a step will have four outputs and, obviously, can have four outcomes. The additional fast-track outputs you can indicate by returning a well-defined signal.
class Create < Trailblazer::Activity::FastTrack
  module Memo::Activity
    class Create < Trailblazer::Activity::FastTrack
      step :validate, fast_track: true
      step :save
      fail :handle_errors

      def validate(ctx, params:, **)
        return Trailblazer::Activity::FastTrack::FailFast if params.nil? #!hint return Railway.fail_fast! if params.nil?

        params.key?(:memo)
      end
      # ...
    end
  end
end
The validate step now has four outputs. You can instruct the two new fast-track outputs by returning either Railway.fail_fast! or Railway.pass_fast!.
When using the slimmer Activity::FastTrack layout, you won’t have access to Railway.pass_fast!. Either use the fully-qualified constant Trailblazer::Operation::Railway.pass_fast! to reference the signal, or return Trailblazer::Activity::FastTrack::PassFast (see “Activity” code tab above).
Note that you don’t have to use both outputs.
The fast-track layout is an attempt to implement best practices. Most of the times, however, you can achieve a similar result using a separate track or terminus.
Since TRB 2.1 it is possible to define the input and output variables for each step. This is called variable mapping, or I/O in short. It provides an interface to define what variables go in and come out of a task, enabling you to limit what steps “see” and what “output” they can add to the context.
It’s one of the most frequently used features in Trailblazer.
Imagine a complex application where policies are protecting your operation code from unsolicited access. This code component - the policy - sits as a step in every business operation and decides whether or not the current user is permitted to execute this very operation.
module Memo::Operation
  class Create < Trailblazer::Operation
    step :create_model
    step Policy::Create # an imaginary policy step.
    # ...
  end
end
The Policy::Create implementation is a simple callable class following the step interface.
module Policy
  # Explicit policy, not ideal as it results in a lot of code.
  class Create
    def self.call(ctx, model:, user:, **)
      decision = ApplicationPolicy.can?(model, user, :create) # FIXME: how does pundit/cancan do this exactly?
      # ...
    end
  end
end
Note that it requires two variables :model and :user from the ctx. For whatever reasons, the author of this class dictated that the “current user” must be passed named :user, not, as it’s a convention in Trailblazer, named :current_user.
Last, depending on the policy decision, the step code returns true or false.
When executing the Create operation using the :current_user variable, an ArgumentError is raised.
result = Memo::Operation::Create.(current_user: Module)

#=> ArgumentError: missing keyword: :user
Since the “current user” is handed into the operation as the :current_user variable, and no other step preceding Policy::Create is setting this variable, the step expecting :user crashes.
And this is why we need variable mapping in Trailblazer.
Variable mapping (short: i/o) can be done manually, with ugly “helper” steps before or after the respective step, or by using In(), Out() and Inject(). Before these helpers got introduced, we used the :input and :output option - both works, the latter one coming with several drawbacks.
Helpers can be used multiple times, depending on how complex the incoming or outcoming variables are, forming a pipeline of filters around the actual task.
module Memo::Operation
  class Create < Trailblazer::Operation
    step :create_model
    step Policy::Create,
      In() => {:current_user => :user},
      In() => [:model],
      Out() => [:message]
    # ...
  end
end
Not only are those input and output pipelines easy to debug, they also allow to be altered in derived operations, when using inheritance, and work in combination with macros.
In() allows to configure variables going into the step. The helper accepts either a mapping hash, a limiting array or a callable object (often a lambda), to compute variables at runtime.
Be wary that once you use In() your are white-listing: only the variables defined in your filters will be passed into the step. All other variables from ctx are invisible in the step.
Picking up the example from above, here’s how a mapping hash “translates” the selected variables from the original ctx object to a new ctx, one that is compatible with Policy::Create’s interface.
class Create < Trailblazer::Operation
  step :create_model
  step Policy::Create,
    In() => {
      :current_user => :user, # rename {:current_user} to {:user}
      :model        => :model # add {:model} to the inner ctx.
    }
  # ...
end
The In() filter will result in :current_user being renamed to :user. Since the policy step also needs :model we need to mention this variable as well, no renaming happening here. The beauty of I/O: this is only visible to Policy::Create!
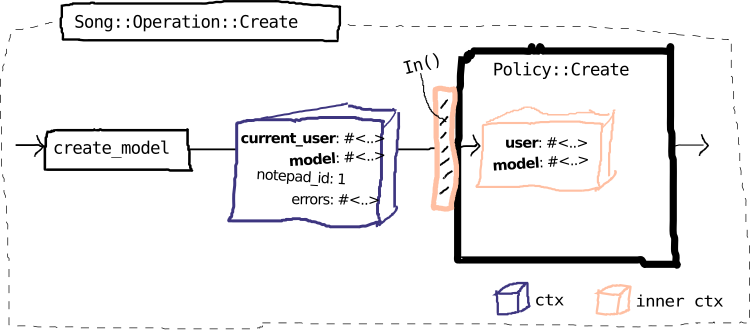
To instantly see what new ctx is passed into the configured step, you could replace the original policy step with a #show_ctx method.
module Memo::Operation
  class Create < Trailblazer::Operation
    step :create_model
    step :show_ctx,
      In() => {
        :current_user => :user, # rename {:current_user} to {:user}
        :model        => :model # add {:model} to the inner ctx.
      }

    def show_ctx(ctx, **)
      p ctx.to_h
      #=> {:user=>#<User email:...>, :model=>#<Memo name=nil>}
    end
    # ...
  end
end
You should use the mapping hash when variables need to be renamed. If variables need to be added without renaming, a limiting array is your friend.
In() accepts an array, listed variables are passed into the new ctx (whether they exist in the original ctx or not!).
module Memo::Operation
  class Create < Trailblazer::Operation
    step :create_model
    step Policy::Create,
      In() => {:current_user => :user},
      In() => [:model]
    # ...
  end
end
This configuration will lead to the exact same new ctx for Policy::Create as in the example above, producing a new ctx that will look as below.
#=> {
#     :user  => #<User email:...>,
#     :model => #<Song name=nil>}
# }As always, you may implement your own input filter with any callable object adhering to the step interface.
module Memo::Operation
  class Create < Trailblazer::Operation
    step :create_model
    step Policy::Create,
      In() => ->(ctx, **) do
        # only rename {:current_user} if it's there.
        ctx[:current_user].nil? ? {} : {user: ctx[:current_user]}
      end,
      In() => [:model]
    # ...
  end
end
Callable In() filters have to return a hash. This hash will be merged with the other In() filters and comprise the new ctx.
And again, when the operation is invoked with a :current_user, this will, result in the same new ctx as above.
#=> {
#     :user  => #<User email:...>,
#     :model => #<Song name=nil>}
#   }
However, if :current_user is nil, Policy::Create will raise an exception complaining about the :user keyword missing.
Following the TRB option standard, an In() filter may even be implemented as an instance method. All you need to do is pass a symbol to In().
module Memo::Operation
  class Create < Trailblazer::Operation
    step :create_model
    step Policy::Create,
      In() => :input_for_policy, # You can use an {:instance_method}!
      In() => [:model]

    def input_for_policy(ctx, **)
      # only rename {:current_user} if it's there.
      ctx[:current_user].nil? ? {} : {user: ctx[:current_user]}
    end
    # ...
  end
end
The method needs to expose a step interface just like any other callable.
Both callables and filter methods for In() can receive ctx variables as keyword arguments, making it a convenient access and have Ruby perform a loose existance test automatically.
module Memo::Operation
  class Create < Trailblazer::Operation
    step :create_model
    step Policy::Create,
                    # vvvvvvvvvvvv keyword arguments rock!
      In() => ->(ctx, current_user: nil, **) do
        current_user.nil? ? {} : {user: current_user}
      end,
      In() => [:model]
    # ...
  end
end
Keep in mind that when not defaulting the keyword argument your filter might crash at runtime when the expected variables were not passed.
Without any output configuration on the exemplary policy step, any variable written to ctx will be automatically set on the outer ctx, passing along internal variabes to the following step.
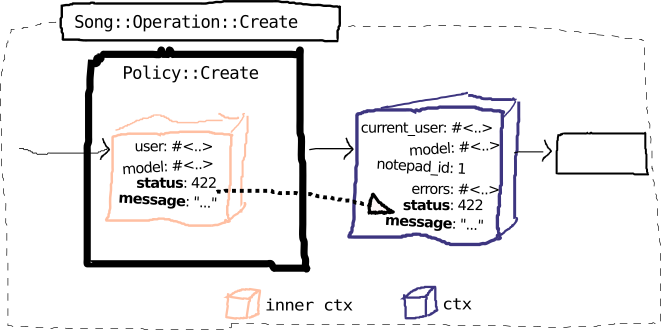
Here, both :status and :message variables that were written in Policy::Create are passed into the outer ctx. The behavior is identical to the way before you were using i/o.
However, it is often necessary to rename or limit the outgoing variables of a particular step. Especially when using nested operations you probably don’t want the entire nested ctx to be copied into the outer context. This is where output filters enter the stage.
Consider the following updated Policy::Create step.
module Policy
  # Explicit policy, not ideal as it results in a lot of code.
  class Create
    def self.call(ctx, model:, user:, **)
      decision = ApplicationPolicy.can?(model, user, :create) # FIXME: how does pundit/cancan do this exactly?

      if decision.allowed?
        return true
      else
        ctx[:status]  = 422 # we're not interested in this field.
        ctx[:message] = "Command {create} not allowed!"
        return false
      end
    end
  end
end
Both ctx[:status] and ctx[:message] will be visible in all steps following Policy::Create. This might lead to “misunderstandings” and bugs in more complex applications.
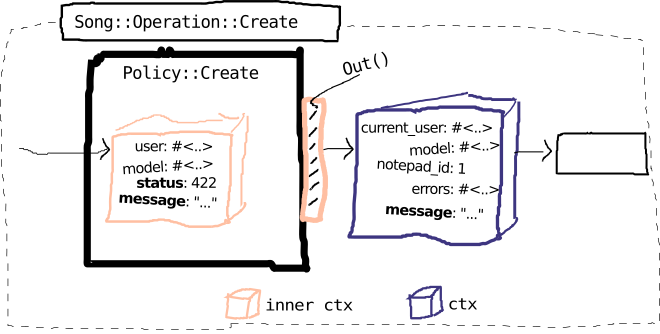
As soon as you use Out(), only variables specified through the filters will be merged with the original (outer) ctx and passed on to the next step.
In order to limit variables added to the outer ctx, Out() accepts an array similar to In(). Consider this as a whitelisting to specify exposed variables.
module Memo::Operation
  class Create < Trailblazer::Operation
    step :create_model
    step Policy::Create,
      In() => {:current_user => :user},
      In() => [:model],
      Out() => [:message]
    # ...
  end
end
This single Out() usage will result in only the :message variable being written to the outer ctx that is passed on. The :status variable is discarded.
You may pass any number of variables in the limiting array.
Renaming variables from the inner to the outer ctx works by providing a mapping hash, where the “old” inner name points to the outer name that you want to use in the operation hosting that step.
module Memo::Operation
  class Create < Trailblazer::Operation
    step :create_model
    step Policy::Create,
      In() => {:current_user => :user},
      In() => [:model],
      Out() => {:message => :message_from_policy}
    # ...
  end
end
Here, steps following Policy::Create will see a variable :message_from_policy merged into the ctx - which is the original :message, renamed.
An Out() filter can be any callable object following the step interface.
module Memo::Operation
  class Create < Trailblazer::Operation
    step :create_model
    step Policy::Create,
      In() => {:current_user => :user},
      In() => [:model],
      Out() => ->(ctx, **) do
        return {} unless ctx[:message]

        { # you always have to return a hash from a callable!
          :message_from_policy => ctx[:message]
        }
      end
    # ...
  end
end
The callable receives the inner ctx that just left the actual step, here Policy::Create. You may run any Ruby code in the callable, even ifs.
Note that a callable always must return a hash, which is then merged with the original outer ctx.
Be adviced that it is usually a better idea to maintain multiple smaller Out() callables for different variables. You might later decide to override them, debugging will be easier and the code is more maintainable. This was different when :output was the only way to filter outgoing variables and you had to create one big hash in a one single filter.
You may also use an :instance_method to filter outgoing variables, similar to how it’s done with In().
Just as with In() callables can receive keyword arguments.
module Memo::Operation
  class Create < Trailblazer::Operation
    step :create_model
    step Policy::Create,
      In() => {:current_user => :user},
      In() => [:model],
      Out() => ->(ctx, message: nil, **) do
        return {} if message.nil?

        { # you always have to return a hash from a callable!
          :message_from_policy => message
        }
      end
    # ...
  end
end
Any variable readable on the inner ctx that just left Policy::Create is available as a keyword argument for a callable. Note that you need to default it if its presence is not guaranteed.
You can access the outer, original ctx by passing the :with_outer_ctx option to Out().
module Memo::Operation
  class Create < Trailblazer::Operation
    step :create_model
    step Policy::Create,
      In() => {:current_user => :user},
      In() => [:model],
      Out() => [:message],

      Out(with_outer_ctx: true) => ->(inner_ctx, outer_ctx:, **) do
        {
          errors: outer_ctx[:errors].merge(policy_message: inner_ctx[:message])
        }
      end
    # ...
  end
end
While the callable still needs to return a hash that is then merged with the original ctx, it’s possible to access variables from the outer ctx through the :outer_ctx keyword argument. This allows for merging deeper data structures, such as error objects.
An Inject() filter, as opposed to In(), does an existance check on the ctx using ctx.key?(:variable) before performing its logic. It is helpful in combination with In() filters, when using defaulted keyword arguments in a step or in nested operations.
:override option.Note that Inject() can be used without In().
Check the following exemplary policy code.
module Policy
  class Check
                                    # vvvvvvvvvvvvvvv-- defaulted keyword arguments
    def self.call(ctx, model:, user:, action: :create, **)
      decision = ApplicationPolicy.can?(model, user, action) # FIXME: how does pundit/cancan do this exactly?
      # ...
    end
  end
end
This policy implementation uses keyword arguments to automatically extract :model, :user and :action from the ctx. Note that the latter is defaulted to :create. Defaulting kwargs only works when the keyword variable is not passed into the step - if it’s nil, the defaulting will not get triggered.
You could now use In() filters to embed this policy step into your operation.
module Memo::Operation
  class Create < Trailblazer::Operation
    step :create_model
    step Policy::Check,
      In() => {:current_user => :user},
      In() => [:model, :action]
    # ...
  end
end
However, this will break because the action variable will never be defaulted to :create. The In() filter will always pass :action through when calling the policy, even when it’s absent.
The Inject() helper is designed to handle this case.
Use Inject() in combination with In() to add variables to the filtered ctx, but only when they’re present in the outer ctx.
module Memo::Operation
  class Create < Trailblazer::Operation
    step :create_model
    step Policy::Check,
      In() => {:current_user => :user},
      In() => [:model],
      Inject() => [:action]
    # ...
  end
end
We call this qualified pass-through, it means the :action variable will only be passed into the filtered ctx if it exists on ctx when the filter is invoked.
Instead of hard-wiring defaulted keyword arguments into your step implementations, you can configure Inject() to set a default value to variables, if they’re absent in the ctx.
Here’s an example policy without any defaulting in the signature.
module Policy
  class Check
                                    # vvvvvvv-- no defaulting!
    def self.call(ctx, model:, user:, action:, **)
      decision = ApplicationPolicy.can?(model, user, action) # FIXME: how does pundit/cancan do this exactly?
      # ...
    end
  end
end
Defaulting the :action variable via Inject() will improve the policy component’s reusability.
module Memo::Operation
  class Create < Trailblazer::Operation
    step :create_model
    step Policy::Check,
      In() => {:current_user => :user},
      In() => [:model],
      Inject(:action) => ->(ctx, **) { :create }
    # ...
  end
end
The lambda is executed at runtime, just before the actual step is invoked. It provides access to the ctx object and allows extracting keyword arguments.
Use the :override option to always set a variable, even if it is already present in the incoming ctx.
Inject(:action, override: true) => ->(*) { :create } # always used.
This is helpful to set configuration variables for an activity while still using the well-established keyword argument mechanics. The Policy::Create class defines :action as a kwarg. This doesn’t necessarily mean the user can always inject and dictate the very value. Instead, we can override any injected value with the “hard-coded” :create value.
module Memo::Operation
  class Create < Trailblazer::Operation
    step :create_model
    step Policy::Check,
      In() => {:current_user => :user},
      In() => [:model],
      Inject(:action, override: true) => ->(*) { :create } # always used.
    # ...
  end
end
The call as below will always use action: :create, even if something else is injected.
result = Memo::Operation::Create.(
  {current_user: current_user,
  action: :update} # this is always overridden.
)
puts result[:model] #=> #<Memo id: 1, ...>
As all DSL options the In(), Out() and Inject() helpers can be used from macros, providing the macro author a convenient way to define default filters.
module Policy
  def self.Create()
    {
      task: Policy::Create,
      wrap_task: true,
      Trailblazer::Activity::Railway.In()  => {:current_user => :user},
      Trailblazer::Activity::Railway.In()  => [:model],
      Trailblazer::Activity::Railway.Out() => {:message => :message_from_policy},
    }
  end
end
In the options hash that a macro must return, you can use the helpers by referencing Trailblazer::Activity::Railway. Except for the prefixed constant, there is no difference or limitation to their usage.
They can be extended with options the macro user provides.
module Memo::Operation
  class Create < Trailblazer::Operation
    step :create_model
    step Policy::Create(),
      Out() => {:message => :copied_message} # user options!
    # ...
  end
end
The user options will be merged into the macro options, resulting in :message being renamed to :message_from_policy and copied to :copied_message.
Before trailblazer-activity-dsl-linear-1.0.0 and the In() and Out() helper shipped with it, any :input from the user would always override the macro’s :input option.
Subclasses can add and remove input and output filters - hence the term composable. This is a great tool when inherited operations replace particular steps and need to fine-tune ingoing or returned variables.
Consider the following base operation.
module Memo::Operation
  class Create < Trailblazer::Operation

    step :create_model
    step Policy::Create,
      In() => {:current_user => :user},
      In() => [:model],
      Out() => [:message],
      id: :policy
    # ...
  end
end
It defines two input and one output filter.
A sub operation could now replace the policy step. However, instead of redefining the i/o filters, they can be inherited and extended.
Here’s a potential inheriting operation.
module Memo::Operation
  class Admin < Create
    step Policy::Create,
      Out() => {:message => :raw_message_for_admin},
      inherit: [:variable_mapping],
      id: :policy,      # you need to reference the :id when your step
      replace: :policy
  end
end
This configuration is adding another Out() filter, resulting in a total filter setup as follows in the introspection.
puts Trailblazer::Developer::Render::TaskWrap.(Memo::Operation::Admin, id: :policy)

Memo::Operation::Admin
# `-- policy
#     |-- task_wrap.input..................Trailblazer::Operation::DSL::Linear::VariableMapping::Pipe::Input
#     |   |-- input.init_hash.............................. ............................................. VariableMapping.initial_aggregate
#     |   |-- input.add_variables.0.994[...]............... {:current_user=>:user}....................... VariableMapping::AddVariables
#     |   |-- input.add_variables.0.592[...]............... [:model]..................................... VariableMapping::AddVariables
#     |   `-- input.scope.................................. ............................................. VariableMapping.scope
#     |-- task_wrap.call_task..............Method
#     `-- task_wrap.output.................Trailblazer::Operation::DSL::Linear::VariableMapping::Pipe::Output
#         |-- output.init_hash............................. ............................................. VariableMapping.initial_aggregate
#         |-- output.add_variables.0.599[...].............. [:message]................................... VariableMapping::AddVariables::Output
#         |-- output.add_variables.0.710[...].............. {:message=>:raw_message_for_admin}........... VariableMapping::AddVariables::Output
#        `-- output.merge_with_original................... ............................................. VariableMapping.merge_with_original
The new Out() filter setting :raw_message_for_admin is placed behind the inherited filter.
Note that inherit: true will, besides other options, also invoke the variable mapping inheritance.
You can visualize the pipelines around each step by using the trailblazer-developer gem.
puts Trailblazer::Developer::Render::TaskWrap.(Memo::Operation::Create, id: :policy)
This handy invocation will render the task wrap around Song::Operation::Create’s step :policy.
Memo::Operation::Create
`-- policy
    |-- task_wrap.input..................Trailblazer::Operation::DSL::Linear::VariableMapping::Pipe::Input
    |   |-- input.init_hash.............................. ............................................. VariableMapping.initial_aggregate
    |   |-- input.add_variables.0.994[...]............... {:current_user=>:user}....................... VariableMapping::AddVariables
    |   |-- input.add_variables.0.592[...]............... [:model]..................................... VariableMapping::AddVariables
    |   `-- input.scope.................................. ............................................. VariableMapping.scope
    |-- task_wrap.call_task..............Method
    `-- task_wrap.output.................Trailblazer::Operation::DSL::Linear::VariableMapping::Pipe::Output
        |-- output.init_hash............................. ............................................. VariableMapping.initial_aggregate
        |-- output.add_variables.0.599[...].............. [:message]................................... VariableMapping::AddVariables::Output
        `-- output.merge_with_original................... ............................................. VariableMapping.merge_with_original
In i/o context, the interesting branches here are task_wrap.input and task_wrap.output. Sandwiched between generic library steps are your filter steps. The visualizer even renders filter configuration where possible.
We’re planning improvements on this part of trailblazer-developer. If you want to help out with better rendering, please come chat to us.
Macros are short-cuts for inserting a task along with options into your activity.
They’re simple functions that return a hash with options described here.
module MyMacro
  def self.NormalizeParams(name: :myparams, merge_hash: {})
    task = ->(ctx, flow_options, _) do
      ctx[name] = ctx[:params].merge(merge_hash)

      return ctx, flow_options, Trailblazer::Activity::Right
    end

    # new API
    {
      task: task,
      id:   name
    }
  end
end
Two required options are :id and :task, the latter being the actual task you want to insert. The callable task needs to implement the [circuit interface].
Please note that the actual task doesn’t have to be a proc! Use a class, constant, object, as long as it exposes a #call method it will flow.
To actually apply the macro you call the function in combination with step, pass, fail, etc.
class Create < Trailblazer::Activity::Railway
  step MyMacro::NormalizeParams(merge_hash: {role: "sailor"})
end
There’s no additional logic from Trailblazer happening here. The function returns a well-defined hash which is passed as an argument to step.
In the returned hash you may insert any valid DSL [step option], such as sequence options like :before, Output() and friends from the wiring API or even :extensions.
The following FindModel macro retrieves a configured model just like trailblazer-macro’s Model() and automatically wires the step’s failure output to a new terminus not_found.
module MyMacro
  def self.FindModel(model_class)
    # the inserted task.
    task = ->(ctx, flow_options, _) do
      model         = model_class.find_by(id: ctx[:params][:id])

      return_signal = model ? Trailblazer::Activity::Right : Trailblazer::Activity::Left
      ctx[:model]   = model

      return ctx, flow_options, return_signal
    end

    # the configuration needed by Trailblazer's DSL.
    {
      task: task,
      id:   :"find_model_#{model_class}",
      Trailblazer::Activity::Railway.Output(:failure) => Trailblazer::Activity::Railway.End(:not_found)
    }
  end
end
See how you can simply add Output wirings by using the well-established mechanics from the wiring API? Remember you’re not in an Activity or Operation namespace and hence need to use the fully-qualified constant reference Trailblazer::Activity::Railway.Output().
To insert that step and its extended wiring, simply call the macro.
class Create < Trailblazer::Activity::Railway
  step MyMacro::FindModel(User)
end
When running the activity without a valid model ID, it will now terminate on End.not_found.
ctx, _, signal = Trailblazer::Developer.wtf?(User::Create, [{params: {id: nil}}])
signal #=> #<Trailblazer::Activity::End semantic=:not_found>

`-- User::Create
    |-- Start.default
    |-- find_model_User
    `-- End.not_found
Using the wiring API in your own macros gives you a powerful tool for harnessing extended wiring without requiring the user to know about the details - the crucial point for a good API.
You can even use other macros in custom macros, such as the Subprocess() helper for nesting activities.
Consider the following Logger activity.
class Logger < Trailblazer::Activity::Railway
  step :log

  def log(ctx, logged:, **)
    ctx[:log] = logged.inspect
  end
end
Along with the nested Logger step should also go :input and :output configuration. When using the Logger in multiple operation, you would need to repeat the options, so why not pack the entire configuration in a macro?
module Macro
  def self.Logger(logged_name: )
    {
      id: "logger",
      Trailblazer::Activity::Railway.In() =>  {logged_name => :logged},
      Trailblazer::Activity::Railway.Out() => [:log],
      **Trailblazer::Activity::Railway.Subprocess(Logger), # nest
    }
  end
end
The nesting activity can now elegantly use the macro without inconvenient options.
class Create < Trailblazer::Activity::Railway
  step Macro::Logger(logged_name: :model) # we want to log {ctx[:model]}
end
The taskWrap is the “around_filter” of Trailblazer. It allows adding steps before and after actual tasks without having to change the activity, and without having to introduce ifs.
Some prominent examples for taskWrap usage in the wild are variable mapping and tracing happening in #wtf?. Those are features completely separated from the core code. You can use the taskWrap mechanics to inject static wraps at compile time (as it’s done for, say, the In() feature), or at runtime, the way #wtf? is built.
It’s possible to configure a specific taskWrap for a particular step, or run the same one for all steps encountered while running an activity, even with nesting.
Let’s discuss the taskWrap with the following simple Create activity that you’ve probably met before.
module Song::Activity
  class Create < Trailblazer::Activity::Railway
    step :create_model
    step :validate
    left :handle_errors
    step :notify
    # ...
  end
end
We’re using an imaginary MyAPM gem that provides a convenient interface for starting and stopping instrumentation.
span = MyAPM.start_span("validate", payload: {time: Time.now})
# do whatever you have to...
span.finish(payload: {time: Time.now})
In order to execute the instrumentation, we have to write two taskWrap steps, one to start, one for finishing the instrumentation. Those steps look similar to “ordinary” activity steps, but expose the taskWrap interface.
module MyAPM # Advanced performance monitoring, done right!
  module Extension
    def self.start_instrumentation(ctx, flow_options, circuit_options, signal, lib_ctx, task:, **) # {task} is the current "step".
      activity  = circuit_options[:activity] # currently running Activity.

      task_id   = Trailblazer::Activity::Introspect.Nodes(activity, task: task).id

      span      = MyAPM.start_span("operation.step", payload: {id: task_id})

      lib_ctx[:span] = span

      return ctx, flow_options, signal, lib_ctx
    end
  end
end
A taskWrap step receives two positional arguments, the wrap_ctx that is used to transport taskWrap-specific data across taskWrap steps, and the original_args that represent how the circuit called the currently invoked task.
Above, you can see how it’s possible to retrieve the currently invoked task and its activity.
We then store the span object in the wrap_ctx so the finishing code can close that span in the second taskWrap step #finish_instrumentation.
module MyAPM # Advanced performance monitoring, done right!
  module Extension
    def self.finish_instrumentation(ctx, flow_options, _, signal, lib_ctx, **)
      span = lib_ctx[:span]

      span.finish(payload: ctx.inspect)

      return ctx, flow_options, signal, lib_ctx
    end
  end
end
As you can see, the span object can be fetched from wrap_ctx as the second step is run somewhere after start_instrumentation.
Each taskWrap has at least one element, the call_task step that calls the actual task. Sometimes this task is a method, such as #validate, sometimes a nested activity, and so on.
The taskWrap can be extended at runtime, when calling an activity. This allow for adding features to steps without having to change the actual business code.
To actually run the Song::Activity::Create activity with this new taskWrap, we need to build a runtime extension.
apm_extension = Trailblazer::Activity::TaskWrap::Extension(
  [MyAPM::Extension.method(:start_instrumentation),  id: "my_apm.start_span",  prepend: "task_wrap.call_task"],
  [MyAPM::Extension.method(:finish_instrumentation), id: "my_apm.finish_span", append: "task_wrap.call_task"],
)
You can configure where to insert the taskWrap steps using :append or :prepend.
We’re now all set to inject that new taskWrap into the execution of our business activity. In the following example, the my_wrap hash is configured in a way that our extension is run around every task in Create, even for Create itself.
my_wrap = Hash.new(apm_extension)

Song::Activity::Create.invoke(
  # ctx:
  {
    song: {title: "Timebomb"},
    seq: []
  },
  {},
  {wrap_runtime: my_wrap} # runtime taskWrap extensions!
)
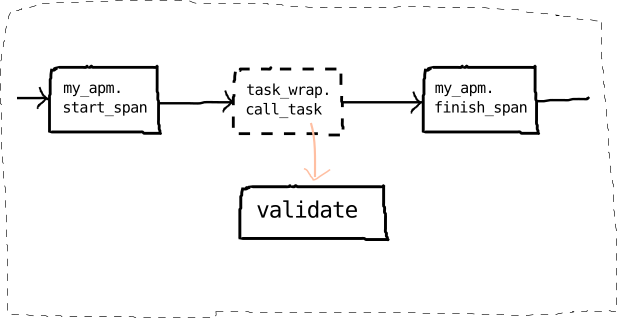
This will result in the same taskWrap being applied to every step of the activity execution path, and for #validate, looks like so.
You don’t have to run a taskWrap extension around every step. It is possible to configure an extension only being applied to a particular step in your activity. Let’s invoke the new APM taskWrap only around #validate.
validate_task = Trailblazer::Activity::Introspect
  .Nodes(Song::Activity::Create, id: :validate) # returns Node::Attributes
  .task                                         # and the actually executed task from the circuit.

my_wrap = {validate_task => apm_extension}
Note that my_wrap can map specific tasks to their taskWrap extension.
When running Create with the new configuration, the APM code is only called for #validate.
Song::Activity::Create.invoke(
  # ctx:
  {
    song: {title: "Timebomb"},
    seq: []
  },
  {},
  {wrap_runtime: my_wrap} # runtime taskWrap extensions!
)
It’s important to understand that even the top activity Song::Activity::Create is run using a taskWrap, so if you want to apply APM only to this particular “step”, you could do so as follows.
my_wrap = {Song::Activity::Create => apm_extension}
Instead of dynamically adding taskWrap extensions at runtime, in some cases you might want to do so when defining the activity class, at compile-time. For example, the In() and Out() filter DSL uses a static taskWrap extension to add steps around a specific task.
This can be achieved with the WrapStatic() helper.
module Song::Activity
  class Create < Trailblazer::Activity::Railway
    step :create_model
    step :validate,
      Extension() => Trailblazer::Activity::TaskWrap::Extension(
        [MyAPM::Extension.method(:start_instrumentation),  id: "my_apm.start_span",  prepend: "task_wrap.call_task"],
        [MyAPM::Extension.method(:finish_instrumentation), id: "my_apm.finish_span", append: "task_wrap.call_task"],
      )
    left :handle_errors
    step :notify
    include T.def_steps(:create_model, :validate, :notify)
  end
end
Obviously, you’d introduce a macro here to hide all those specific details to the user of your extension.
When running, the APM instrumentation is run only around #validate.
ctx, _ = Song::Activity::Create.invoke(ctx, {})
You can use our web-based debugger to introspect the static taskWrap of any step.
This section discusses low-level structures and is intended for engineers interested in changing or adding their own DSLs, the activity build process, or who want to optimize the Trailblazer internals (which is always appreciated!).
To introspect an activity and find out about steps, IDs and configuration, use the Introspect.Nodes() function.
Consider the following activity.
module Song::Activity
  class Create < Trailblazer::Activity::Railway
    step :validate
    step Subprocess(Save),
      id: :save
  end
end
You can retrieve a datastructure describing a particular task by ID.
attrs = Trailblazer::Activity::Introspect.Nodes(Song::Activity::Create, id: :validate)
The returned Attributes object exposes #id, #data and #task.
puts attrs.id   #=> :validate
puts attrs.task #=> #<Trailblazer::Activity::TaskBuilder::Task user_proc=validate>
puts attrs.data[:extensions] => []
It also accepts a :task option if you need to find attributes for a step where you only know the code component, not the ID. This is, for example, used in the tracing code.
attrs = Trailblazer::Activity::Introspect.Nodes(Song::Activity::Create, task: Song::Activity::Save)
attrs.id #=> :save
The returned Attributes instance behaves identically to the above.
Note that you can use Attributes to query custom data from the DSL.
Activities and all tasks (or “steps”) are required to expose a circuit interface. This is the low-level interface. When an activity is executed, all involved tasks are called with that very signature.
Most of the times it is hidden behind the task interface that you’re probably used to from your operations when using step. Under the hood, however, all callable circuit elements operate through that very interface.
The circuit interface consists of three things.
call method.call method is call((ctx, flow_options), **circuit_options).call method is an array of format [signal, [new_ctx, new_flow_options]].Do not fear those syntactical finesses unfamiliar to you, young padawan.
class Create < Trailblazer::Activity::Railway
  def self.validate(ctx, flow_options, _circuit_options)
    # ...
    return ctx, flow_options, signal
  end

  step task: method(:validate)
end
Both the Create activity itself and the validate step expose the circuit interface. Note that the :task option for step configures this element as a low-level circuit interface, or in other words, it will skip the wrapping with the task interface.
Maybe it makes more sense now when you see how an activity is called manually? Here’s how to invoke Create.
ctx          = {name: "Face to Face"}
flow_options = {}

ctx, _flow_options, signal = Create.(ctx, flow_options, {})

signal #=> #<Trailblazer::Activity::End semantic=:success>
ctx    #=> {:name=>\"Face to Face\", :validate_outcome=>true}
Note that both ctx and flow_options can be just anything. Per convention, they respond to a hash interface, but theoretically it’s up to you how your network of activities and tasks communicates.
Check the implementation of validate to understand how you return a different signal or a changed ctx.
def self.validate(ctx, flow_options, _circuit_options)
  is_valid = ctx[:name].nil? ? false : true

  ctx    = ctx.merge(validate_outcome: is_valid) # you can change ctx
  signal = is_valid ? Trailblazer::Activity::Right : Trailblazer::Activity::Left

  return ctx, flow_options, signal
end
Make sure to always stick to the return signature on the circuit interface level.
The circuit interface is a bit more clumsy but it gives you unlimited power over the way the activity will be run. And trust us, we’ve been playing with different APIs for two years and this was the easiest and fastest outcome.
def self.validate(ctx, flow_options, _circuit_options)
  # ...
  return ctx, flow_options, signal
end
The alienating signature uses Ruby’s decomposition feature. This only works because the first argument for call is actually an array.
Using this interface empowers you to fully take control of the flow™.
signal you want, not only the binary style in steps. Do not forget to wire that signal appropriately to the next task, though.ctx object might be mutated or, better, replaced and a new version returned. This is the place where you’d start implementing an immutable version of Trailblazer’s ctx, for instance.flow_options, which will be passed onwards through the entire activities flow. Know what you’re doing when using flow_options and always return it even if you’re not changing it.circuit_options is another framework argument needed to control the start task and more. It is immutable and you don’t have to return it. The same circuit_options are guaranteed to be passed to all invoked tasks within one activity.Since in 99% the circuit_options are irrelevant for you, it’s nicer and faster to discard them instantly.
def validate((ctx, flow_options), *)
  # ...
end
Use the lonely * squat asterisk to do so.
The last positional argument when calling an activity or task is called circuit options. It’s a library-level hash that is guaranteed to be identical for all tasks of an activity. In other words, all tasks of one activity will be called with the same circuit_options hash.
The following options are available.
You can instruct the activity where to start - it doesn’t have to be the default start event! Use the :start_task option.
Consider this activity.
class Create < Trailblazer::Activity::Railway
  # ...
  step :create
  step :validate
  step :save
end
Inject the :start_task option via the circuit options. The value has to be the actual callable task object. You can use the [introspection API] to grab it.
circuit_options = {
  start_task: Trailblazer::Activity::Introspect::Nodes(B::Create, id: :validate).task
}

ctx, flow_options, signal = B::Create.(ctx, flow_options, circuit_options)
Starting with :validate, the :create task will be skipped and only :validate and then :save will be executed.
Note that this is a low-level option that should not be used to build “reuseable” activities. If you want different behavior for differing contexts, you should compose different activities.
When using the step :method_name DSL style, the :exec_context option controls what object provides the method implementations at runtime.
Usually, Activity#call will automatically set this, but you can invoke the circuit instead, and inject your own exec_context. This allows you to have a separate structure and implementation.
The following activity is such an “empty” structure.
class Create < Trailblazer::Activity::Railway
  step :create
  step :save
end
You may then use a class, object or module to define the implementation of your steps.
class Create::Implementation
  def create(ctx, params:, **)
    ctx[:model] = Memo.new(params)
  end

  def save(ctx, model:, **)
    ctx[:model].save
  end
end
    end
This is really just a container of the desired step logic, with the familiar interface.
When invoking the Create activity, you need to call the circuit directly and inject the :exec_context option.
circuit_options = {
  exec_context: C::Create::Implementation.new
}

ctx, flow_options, signal = C::Create.to_h[:circuit].(ctx, flow_options, circuit_options)
While this bypasses Activity#call, it gives you a powerful tool for advanced activity design.
When using the DSL, use the :task option if you want your added task to be called directly with the circuit interface. This skips the TaskBuilder::Binary wrapping.
class Create < Trailblazer::Activity::Railway
  # ...
  step task: method(:validate)
end
a.k.a. Task interface
The convenient high-level interface for a task implementation is - surprisingly - called task interface. It’s the one you will be working with 95% of your time when writing task logic.
This interface comprises of two parts.
ctx object, and an optional list of keywords, often seen as (ctx, **).true, false, or a subclass of Activity::Signal to dictate the control flow.The return value does not control what is the next task. Instead, it informs the circuit runner about its outcome, and the circuit runner will find the task executed next.
module Memo::Operation
  class Create < Trailblazer::Activity::Railway
    def self.create_model(ctx, **)
      attributes = ctx[:attrs]           # read from ctx

      ctx[:model] = Memo.new(attributes) # write to ctx

      ctx[:model].save ? true : false    # return value matters
    end

    step method(:create_model)
    # ...
  end
end
Components (such as methods or callable objects) exposing the step interface always receive the ctx as the first (and only) positional argument. Keyword arguments may be used to extract variables from the ctx.
Depending on the step’s logic, you can write variables to the ctx object.
The return value can be either a subclass of Trailblazer::Activity::Signal or it will be evaluated to true or false.
A cleaner way to access data from the ctx object is to use keyword arguments in the method signature. Trailblazer makes all ctx options available as kw args.
def self.create_model(ctx, attrs:, **) # kw args!
  ctx[:model] = Memo.new(attrs)        # write to ctx

  ctx[:model].save ? true : false      # return value matters
end
You may use as many keyword arguments as you need - it will save you reading from ctx manually, gives you automatic presence checks, and allows defaulting, too.
Using the DSL, your task will usually be wrapped in a TaskBuilder::Binary object, which translates a nil and false return value to an Activity::Left signal, and all other return values to Activity::Right.
def self.create_model(ctx, attrs:, **) # kw args!
  # ...
  ctx[:model].save ? true : false      # return value matters
end
In a Railway activity, a true value will usually result in the flow staying on the “success” path, where a falsey return value deviates to the “failure” track. However, eventually it’s the developer’s decision how to wire signals to connections.
You are not limited to true and falsey return values. Any subclass of Activity::Signal will simply be passed through without getting “translated” by the Binary wrapper. This allows to emit more than two possible states from a task.
module Memo::Operation
  class Create < Trailblazer::Activity::Railway
    DatabaseError = Class.new(Trailblazer::Activity::Signal) # subclass Signal

    def create_model(ctx, attrs:, **)
      ctx[:model] = Memo.new(attrs)

      begin
        return ctx[:model].save ? true : false  # binary return values
      rescue
        return DatabaseError                    # third return value
      end
    end
    # ...

    step :create_model,
      Output(DatabaseError, :handle_error) => Id(:handle_db_error)
    step :handle_db_error,
      magnetic_to: nil, Output(:success) => Track(:failure)
  end
end
The exemplary DatabaseError is being passed through to the routing and interpreted. It’s your job to make sure this signal is wired to a following task, track, or end (line 16).
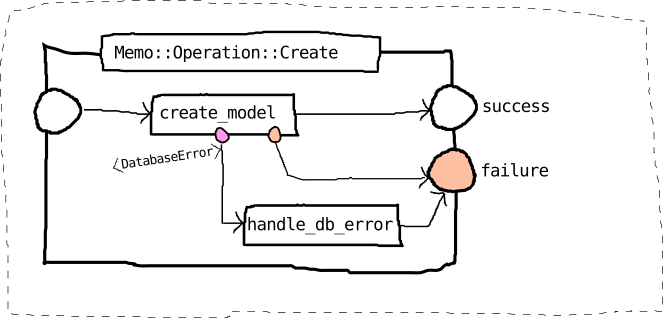
Note that you don’t have to use the default binary signals at all (Left and Right).
Most of your code will be using Trailblazer::Operation, which is nothing more than a Activity::FastTrack layout.
However, if you only need a linear layout of steps, where each step is connected to its follower, you can use the Activity::Path layout.
Per default, this activity will only expose one success terminus but you’re free to customize it using the Wiring API.
module Memo::Activity
  class Create < Trailblazer::Activity::Path
    step :validate
    step :create
    # ...
  end
end
Without any additional DSL options, this results in a straight path.
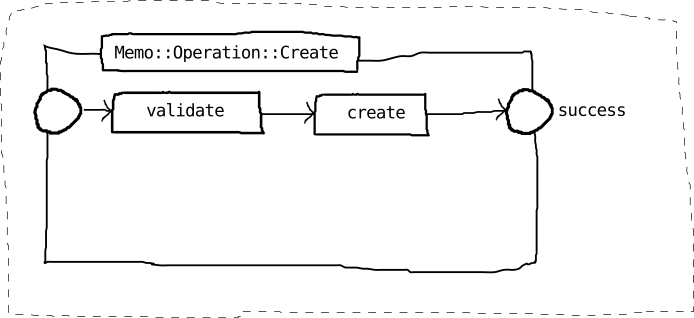
In turn, this means that only true return values in your tasks will work. The DSL will, per default, wrap every task with the Binary interface, meaning returning true will result in Activity::Right, and false in Activity::Left. Currently, only Right signals are wired up.
You may add as many outputs to a task as you need. The DSL provides the Output() helper to do so.
class Create < Trailblazer::Activity::Path
  step :validate, Output(Trailblazer::Activity::Left, :failure) => End(:invalid)
  step :create
  # ...
end
The Path strategy only maintains the :success/Activity::Right semantic/signal combination. Any other combination you need to define explicitly using Output(signal, semantic).
The End() helper allows creating a new end event labelled with the specified semantic.
class Create < Trailblazer::Activity::Path
  step :validate, Output(Trailblazer::Activity::Left, :failure) => End(:invalid)
  step :create
  # ...
end
This will result in the following circuit.
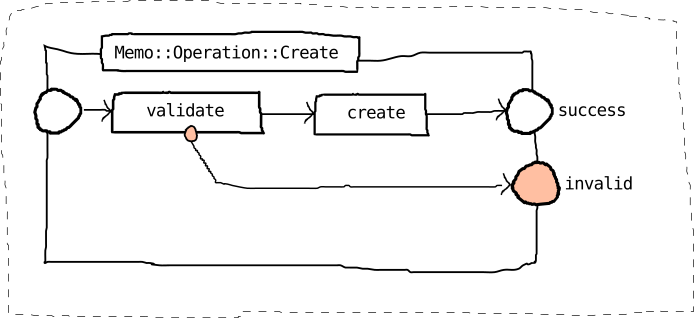
The validate task now has a success and a failure output. Since it’s wrapped using Binary it may return true or false to dictate the used output (or Activity::Right/Activity::Left since it’s the [task interface]).
class Create < Trailblazer::Activity::Path
  # ...
  def validate(ctx, params:, **)
    ctx[:input] = Form.validate(params) # true/false
  end

  def create(ctx, input:, **)
    Memo.create(input)
  end
end
The activity will halt on the :invalid-labelled end if validate was falsey.
ctx = {params: nil}
ctx, flow_options, signal = Memo::Create.([ctx, {}])

puts signal #=> #<Trailblazer::Activity::End semantic=:invalid>
The Activity::Railway layout is great for simple railway activities. It’s used in many places in our gems for two-track code flow where additional features such as :fast_track are not needed.
  module Memo::Activity
    class Create < Trailblazer::Activity::Railway
      step :validate
      step :save
      left :handle_errors
      step :notify
      # ...
    end
  end
It has two tracks and two termini leading to success and failure.
This layout is perfect for internal “mini activities” in your applications.
Based on the Railway strategy, the FastTrack pattern allows to “short-circuit” steps and exit the circuit at particular events.
This layout provides up to four outputs for any step.
It’s important to understand that an Operation is really just a thin public API around Activity::FastTrack. All it adds is a more convenient #call method for public use, and the Result object. The DSL and features are identical.
Please refer to the operation docs to learn how to leverage the fast-track tracks.
:pass_fast, :fail_fast and :fast_track) may be used with step, pass or fail. If in doubt, [render the circuit].:pass_fast and :fail_fast can be used in combination.If you want to configure values or dependencies on the operation class level, use the ClassDependencies module.
The usage of this feature is not recommended. Use a dry-container instead.
You may use the self[]= setter to add directives to the operation class.
These variables will be available within every step of the operation and after.
Starting with the invocation of the Create operation, the validator variable is injected into the ctx and passed on.
The variable is readable from ctx even when the operation finishes - so be careful in nested setups.
Note that variables from within a nested operation are readable in the outer operation after the nested one has been invoked.
Even though tracing and wtf? attempt to make your developer experience as smooth as possible, sometimes there are annoying issues.
It’s a common error to use a bare Hash (with string keys!) instead of a Trailblazer::Context object when running an activity. While symbolized hashes are not a problem, string keys will fail.
ctx = {"message" => "Not gonna work!"} # bare hash.
Bla.(ctx, {})
The infamous TypeError means your context object can’t convert strings into symbol keys. This is required when calling your steps with keyword arguments.
TypeError: wrong argument type String (expected Symbol)
Use Trailblazer::Context as a wrapper.
ctx = Trailblazer::Context({"message" => "Yes, works!"})

ctx, _, signal = Bla.(ctx, {})
The Context object automatically converts string keys to symbols.
When using the same task multiple times in an activity, you might end up with a wiring you’re not expecting. This is due to Trailblazer internally keying tasks by their object identity.
class Update < Trailblazer::Activity::Railway
  class CheckAttribute < Trailblazer::Activity::Railway
    step :valid?
  end

  step :find_model
  step Subprocess(CheckAttribute), id: :a
  step Subprocess(CheckAttribute), id: :b # same task!
  step :save
end
When introspecting this activity, you will see that the CheckAttribute task is present only once.
You need to create a copy of the method or the class of your callable task in order to fix this and have two identical steps.
class Update < Trailblazer::Activity::Railway
  class CheckAttribute < Trailblazer::Activity::Railway
    step :valid?
  end

  step :find_model
  step Subprocess(CheckAttribute), id: :a
  step Subprocess(Class.new(CheckAttribute)), id: :b # different task!
  step :save
end
As the name suggests, the IllegalSignalError exception is raised when a step returns a signal that is not registered at compile time. The routing algorithm is not able to find a connection for the returned signal and raises an error at run-time.
Usually, you encounter this beautiful exception when using the circuit interface signature for a step, and returning a “wrong” signal that is not wired to an on-going next task.
Other common cases may be
step task: method(:validate)class Create < Trailblazer::Activity::Railway
def self.validate(ctx, flow_options, circuit_options)
return ctx, flow_options, :invalid_signal
end
step task: method(:validate)
end
ctx = {"message" => "Not gonna work!"} # bare hash.
Create.(ctx, {})
# IllegalSignalError: Create:
# Unrecognized Signal `:invalid_signal` returned from `Method: Create.validate`. Registered signals are,
# - Trailblazer::Activity::Left
# - Trailblazer::Activity::Right
The exception helps by displaying both the actually returned signal and the registered, wired signals for this step.